Pilot Update Service is compatible with scripting in Viz Pilot Edge templates. It runs as a service on the same host as Pilot Data Server, and accepts requests to run the internal template’s JavaScript in the onUpdate method, or auto-update the data through feed bound fields for the given data element. The service is usually called from Media Sequencer when the data element is being played out in the Viz Engine. The following topics are covered:
Configuring Update Service
The configuration of Pilot Update Service, is written to and retrieved from appsettings.json in the installation folder, for example %ProgramFiles%\Vizrt\Pilot Data Server\UpdateService.
The default ports for the service are 1991 for HTTP and 1992 for HTTPS.
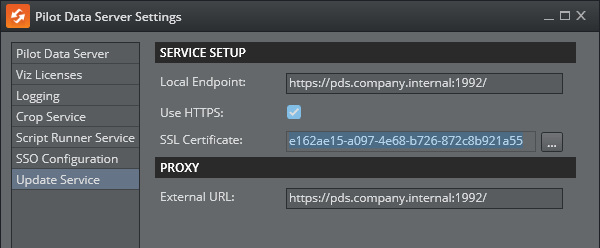
Local Endpoint: URL where the service is running and reachable on the localhost. Use the existing, suggested URL or type in a different URL. The port of this URL is used when the service is starting.
Use HTTPS: Check this box if the service is expected to run in secure mode, communicating with SSL/TLS over the HTTPS protocol.
SSL Certificate: Certificate chosen from the Windows Certificate Store, used by the server to allow clients to connect securely.
External URL: If the service runs behind a proxy, this is the URL the service should be reachable from outside the proxy. Media Sequencer is typically the device that calls Update Service, therefore, this URL has to be reachable from the Media Sequencer host. The URL should be the same as the Local Endpoint if there is no proxy present.
Configuring Certificate Authorities (CAs)
The Pilot Update Service runs as a Windows service and wraps a Node.js server internally. While the Windows service can utilize certificates from the Windows Certificate Store to allow clients to connect securely, the Node.js component also needs certificates for its internal functionality. Specifically, the Node.js server connects to a Pilot Data Server to download the script and the VDF model, and the update script itself may fetch resources from servers on HTTPS, which requires properly configured certificate authorities (CAs) to validate those connections.
Configuring a Certificate for the Windows Service
The Pilot Update Service allows secure client connections by binding a selected certificate from the Windows Certificate Store. To configure the certificate:
Access the Certificate Selection Dialog:
Click the button with the three dots (
...) in the service configuration UI. This opens the Windows Certificate Store browser.
Select a Certificate:
In the certificate selection dialog, click More choices to view all registered certificates under the Personal (My) store.
Select the desired certificate from the list. Ensure the certificate is valid and matches the intended domain or service usage.
After selecting the certificate, it is automatically used by the service for HTTPS communication without further manual steps.
Configuring a Custom CA for Outgoing Connections
Please follow these steps to configure the internal Node.js server to use custom CAs for its internal HTTPS communication:
Note: These steps are only required when using custom Certificate Authorities (CAs). If the certificates are issued by an officially recognized CA, no additional configuration is necessary.
Step 1: Export the Required Certificate(s) from the Windows Certificate Store
Open Certificate Manager:
Press
Win + R, typecertmgr.msc, and pressEnter.
Locate the Certificate:
Navigate to the appropriate certificate store (for example,
Trusted Root Certification AuthoritiesorIntermediate Certification Authorities).
Export the Certificate:
Right-click on the desired certificate and select All Tasks > Export.
In the Certificate Export Wizard:
Choose Base-64 encoded X.509 (.CER) as the export format.
Save the exported file to a known location (for example,
C:\certificates\mycert.cer).
Repeat for Additional Certificates (if necessary):
If multiple certificates are required, export each one individually.
Step 2: Combine Certificates (Optional)
If you need to provide multiple certificates, combine them into a single PEM file:
Open each exported
.cerfile in a text editor (for example, Notepad).Copy and paste the content of each file into a new file, ensuring they are in the correct order:
-----BEGIN CERTIFICATE-----<Certificate1Content>-----END CERTIFICATE----------BEGIN CERTIFICATE-----<Certificate2Content>-----END CERTIFICATE-----Save the combined file as a
.pemfile (for example,C:\certificates\custom-ca.pem).
Step 3: Configure Node.js to Use the Custom CAs
Set the Environment Variable:
Define the
NODE_EXTRA_CA_CERTSenvironment variable and point it to the PEM file:Open the System Properties dialog:
Press
Win + Pause/Break> Advanced system settings > Environment Variables.
Under System variables, click New.
Set the following:
Variable name:
NODE_EXTRA_CA_CERTSVariable value: Path to the PEM file (for example,
C:\certificates\custom-ca.pem).
Restart the Pilot Update Service:
Restart the service to apply the changes.
Note:
The Windows service does not require additional configuration for CAs if certificates are already available in the Windows Certificate Store for client connections.
The Node.js server requires the custom CA configuration described above, to connect to other HTTPS resources securely.
When combining certificates, maintain the order: root certificates should appear last, preceded by intermediate and leaf certificates.
By following these steps, the Pilot Update Service handles both secure client connections via the Windows service and internal HTTPS communication within the Node.js server.
Logging
Pilot Update Service uses Serilog, a robust and flexible logging library, to capture and manage application logs. Serilog supports structured logging and can output logs to various sinks, such as files and the console, making it easier to monitor and troubleshoot the service. The system applies the following Serilog settings:
Outputs:
Logs are written to both the console and a file located at
%ProgramData%\Vizrt\logs\Pilot Update Service\service<date>.log.
File Retention and Size Management:
A maximum of 31 log files are retained. When the limit is exceeded, the oldest file is deleted.
Each log file has a size cap of 1GB. If this limit is reached, logging to the file stops. This safeguard prevents excessive file creation, particularly in scenarios such as infinite loops, ensuring key log data remains intact.
Log Levels:
The default log level is Information.
For non-lifetime, Microsoft-based events, the log level is set to Warning to reduce noise from routine request processing.